Monday, May 14, 2007

Taking pictures of quilts and Mother's Day Happiness


Taking a picture of a quilt can be quite a challenge. Either the quilt is so big you can't get it all in and focused properly or you have to shoot it at an angle. I think I've solved this dilemma, at least for myself, by bringing my quilts outside and photographing them in nature or on my front porch. You can see the difference the shade makes verses the full sun
and mottled shade.

This is an Arced Double Wedding Ring quilt that I made for my daughter Chelsea when she was very young. The front is pieced with a whole cloth back. I say whole cloth when I don't piece the back with different fabrics to use up the stash. Shame on me there is no label on the back, and you know how I feel about labels-they must be there for the future, so this will move to the top of my handwork pile by the TV and I will put one on it. The sad thing is I think I made it around 1992. I remember taking several classes at that time and I imagine that's about the time frame. But, you know at least it will have a date and designate whose it is. Perhaps, in the future my girls decide they both want one of my quilts, there will be no doubt to whom it was given.

I started following the design of the print on the fabri
c for the quilting, which is a perfectly viable option for quilting, but, I just don't like that quilting design for this quilt. I think I'll redo it and will have to come up with another design for the center of the rings. I love this quilt and it's soft colors. Notice the all over soft harmony of color. The curved binding is one of the most difficult things to do in quilting. This is a twin size quilt, made for her bed at the time. Some quilts really do make our hearts smile.

Next is another quilt I made for Chelsea, I try to switch back and forth between my daughters, it just so happens I've picked up two for photographing for my blog that are Chelsea's. I'll try to get 2 for Jennifer next time. Anyway, this is made with my favorite block, Ohio Star. The offsetting squares are Kaffe Fassett bright clear fabrics. These are set against the dustier/duller Japanese fabrics, which give an illusion of the bright squares floating on the quilt. I like the use of color and quilting to add another dimension to an overall quilt design. This is a full/queen size quilt made for her bed later in life.

The back is stash busting supreme,


using huge chunks of fabric sewn together.
You can see my free motion quilting
on the back and

there is a label.


So much for the quilting part of the this post.

I had such a great Mother's Day yesterday. We went to Marengo Cave, in Indiana, which is about 45 minutes from Crestwood, Kentucky, where we live. For about $30.00, we were able to go spelunking (cave exploring),

have a picnic and also go on a float trip on the Blue River with Cave
Country Canoes. Great fun. I hope everyone got to have a great special Mother's Day. If you live anywhere near that area, I highly recommend visiting. There was also a pretty good restaurant, the Blue River Cafe, although, I think they were slammed with people and understaffed for Mother's Day, so service was pretty slow. But, it was right next to the canoe rental and we worked up an appetite canoing.

Happy Quilting!

Saturday, May 12, 2007

A quilt grows and a cowbird mystery...hmmm


First the quilt. It's a really big quilt. We have a king size bed and it needs to be large on the face of it and then comes the borders to hang over the sides. I like combining appliqué and piecing so the quilt will have an appliquéd outer border, with vines and tulips. If you click on the label of this post, pink and brown scrap quilt, you should be able to see all the work I've been doing on this quilt, as well as the book the pattern is from.


Now on to the next example/lesson for adding the borders. I usually like an inner border to set off the quilt, but not always. In this case I have added an inner border, which is light brown with polka dot to frame the inside of the pink and brown hour glass/nine patch quilt. I don't know what I'll name it, maybe something will hit me as I write.

Anyway, I like to tear my fabric. As long as it's good quality fabric you should be fine doing that. Especially for borders, where you are cutting many yards of fabric, tearing is easier than wearing out your hands. This is a great quality Northcott brand fabric. To me, their fabric is close but not exactly like, Liberty of London fabric, which is like butter. If your fabric is not so great, you might get a lot of thread pulls when you rip, so check a small piece before you tear. You will get some little ripples, but, should not have any deep thread pulls.

I also like a mitered border. When you are tearing your border fabric, be sure to add extra fabric in order to make the miter. You will want an extra amount of at least the width of the border and I add a couple of inches more for good measure. You can always cut fabric-it's harder to add to something. Sew your inner border on first, miter it, then attach the outer border. To miter it, fold the borders on top of each other and draw a line from the seam of the inner border out to the end of the mitered outer border. Pin and sew on the line. Trim the seam and iron. Repeat on all the sides. The next time I work on this, I'll be adding my applique vine and flowers, using the Quilt in a Day method of applique and using the Fast Turn tool for the vine. But, this post is getting pretty long, so it's off to bird land, my other favorite hobby.


Has everyone turned on their air conditioner? We are still trying to save some money and have 4 fans running-2 pointed in the house-2 pointed out of the house to really circulate the air. So far, it's 85 degrees outside and I'm working with a sewing machine and iron and am staying comfortable.


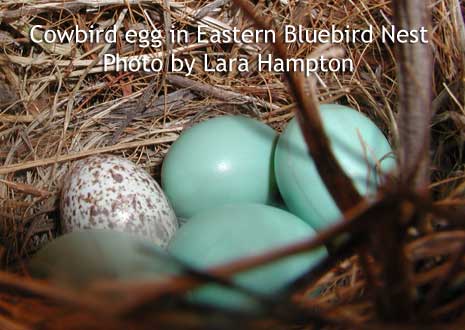
The cowbird, I've only recently learned, is a parasite of sorts. It likes to lay it's eggs in another birds nest and lets them sit on it and raise it.

Anyway, the other day I opened my front door and noticed the floral wreath had fallen off the door. Underneath the wreath lay a broken egg. I thought, OMG, someone in our neighborhood doesn't like us! What did I do? Was I driving a little too fast? Should I have gone to that party, but, had other plans...hmmmm....

Upon further inspection, I realized the egg was splattered away from the front door. Not towards it like someone throwing it at us. Then I noticed is was really small with light brown speckles.
So I went upstairs and don't we all just love the Internet for the answer to anything? Sure enough, that egg matched the egg of the cowbird and don't you know, that bird has been a regular visitor to our bird feeder. So mystery solved!

Thursday, May 10, 2007

Graduation and quilting...smile...


My oldest has graduated from Indiana University with an English writing degree. The ultimate irony was her red velvet cake writing was spelled wrong.

Now the hunt begins for a gainfully employable job, or for her to decide if she wants more schooling. Life is so good, but she's not one to make a snap decision so, we are praying for the right thing for her, whatever that is that makes her happy and some money.

Anyway, I'm still working on my pink and brown scr
ap quilt. It's a king size scrap quilt and I will be adding a border to be appliquéd next. I think my favorite quilts are those that mix appliqué and piecing in one quilt. I haven't done that many with that combination.

Also on my list of items to work on is a
blooming rose quilt that was a signature quilt in our group and we will be showing off the finished tops at our June party at Shirley's house. Quilt groups are great. There's so much support and encouragement in them. If you can find one with the right chemistry for you, it's a great thing.

Happy Quilting!

Sunday, May 6, 2007

Decorate you house with quilts

Besides a quilt rack, there are many ways to display your quilts. My favorite is in the living room. I do like snuggling up with rag quilts and reading a good magazine or book every morning, so it's easy to sit on one draped over a chair, then I can wrap it around myself...smile...

Quilters, in general, like stuff. I guess I'm no exception. My "stuff" consists of things that are personal. There are not many things more personal than a quilt you have created. Whether with a pattern or not, they usually take a long to make, sometimes carry our blood and for sure have heard us think most personal thoughts. Oh, you think your quilts can't hear you? They become like our children that we don't mind about setting a good example for. Not that we'd do anything really bad, but, you know, quilters are human and may slip up, on occasion. Love those quilts!

Does anyone have this problem? Kids taking over the computer? I don't mind, she's home and we know she's safe. It's a lovely spring day here in Kentucky, USA. The Derby was yesterday and I didn't go. It is way too crowded for me. It's another wonderful tradition in the bluegrass. But, I do like it here, since moving from Houston, Texas, USA. We didn't have all these interesting creatures in our backyard there.

Thursday, May 3, 2007

The greatest book on quilt history I've ever read...

As a quilter nonplussed and over quilted, to some extent, I've been eager to find something new in quilting. Little did I know that I'd find renewed enthusiasm for my craft in the past. This book, Antique Quilt Masterpieces, by Shelly Zegart, is just the bit of quilting history to ignite my passion once again. Blips, here and there, in the quilt world-a new gadget, a new technique or style of fabric will spark my interest, but, after reading the first few pages of this book, I am renewed and will begin a greater understanding of the historical and yet practical reasons why I quilt.

Here is a sample of the fine history and writing in this book, which I could not put down.

"A woman sometimes used a quilt to record her memories and, in the process, to immortalize herself as its maker. An elderly Ohio quiltmaker described a quilt she had pieced as follows: "My whole life is in that quilt. It scares me sometimes when I look at it. All my joys and all my sorrows are stitched into those tiny pieces. When I was proud of the boys and when I was downright provoked and angry with them. When the girls annoyed me or when they gave me a warm feeling around my heart. And John, too. He was stitched into that quilt and all the thirty years we were married. Sometimes I loved him and sometimes I sat there hating him as I pieced the patches together. So they are all in that quilt, my hopes and fears, my joys and sorrows, my loves and hates. I tremble sometimes when I remember what that quilt knows about me."

Isn't that beautiful? "I tremble sometimes when I remember what that quilt knows about me?" OMG! Quilters are awesome! Again, this was written, according to Ms. Zegart, by a woman named Jane Carr, in 1814. I've just begun reading this book, and felt I had to share a little of what I've read so far, with the quilters I've come to share things with on my blog.

I don't have just one quilt that I share my trembles with. I have many, I guess that progress for ya...smile...

Thursday, April 26, 2007

Rag Quilts


Here's my first rag quilt I made about 3 years ago. It's made of dusty/muted colored flannel, raw silk and chenille fabric. I like this texture combination, both visually and the way it feels on my lap. It's a bit heavier, but, I like it that way-so cozy in the morning while reading my favorite magazine or book. It just feels good.

For a first time quilter, especially teenagers or children, making a rag quilt is a great option. You have all the elements in quilting, cutting; sewing and quilting in 1 block intervals, which makes it easier to handle and again, having instant gratification children that we seem to be growing these days, it's a relatively quick quilt to finish and feel good about.

This is a flannel and silk lap quilt
I made with my DD last year. In this particular quilt there is a bit of loosely woven silk, but it's mostly flannel. Chelsea chose the fabric and I think she did pretty good selecting fabric and colors.

You can get a free rag quilt pattern, if you really need the extra reminders, but, I'll tell you how we made this marvelously easy quilt right now. Of course there are many options, but this is what we did. Layering the fabric and using an Olfa cutting wheel, we cut 6.5 inch squares of flannel and 5 inch squares of batting. You want the batting much smaller, since one side of the quilt will have exposed seams and the batting should not been seen sticking out. But, if it does, all you need to do is trim it back. This is a great way to use scraps of batting from other projects, that have never been big enough to use anywhere else. Any type of inexpensive batting will do for this project.

I think I like quilting so much because in quilting and sewing, there is almost nothing you can't fix. And don't get hung up on perfection! A quilt on a bed or on your lap is always better than perfectly unfinished. Besides, there's enough other stress in the world that we don't want to have to carry that stress over into what should be our most enjoyable time.

All the material in the quilt we made together has bright clear colors. In my opinion, an easy way to choose fabrics is look for all clear colors or all dusty colors. The effect is pleasing, although I've combined dusty/muted colors and clear colors for certain effects. I'll write in another post about that soon. I digress...

Take one 6.5 inch flannel square; center a 5 inch batting square on the wrong side of the flannel and then top the batting with the wrong side facing the batting. In other words, all you see on front and back of the sandwich is the right sides of the flannel. Make 60 or 70 sandwiches for a lap quilt.

Chain quilt them with a big "X". Begin by lining up the sandwiches, diagonally, corner to corner at your needle of the machine. Sew one corner to corner, then, don't cut the thread, just butt the next one up to the one you just completed and continue quilting your sandwiches. After you've sewn them all, clip them and do the same on the opposite corner to corner and all your squares should have an "X" going through them. Next to using the Olfa cutting wheel, chain sewing or quilting is one of the fastest ways to finish a quilt. I've shown this technique on earlier posts, feel free to explore to see it in action.

Now you take your mini quilts and begin joining them together using a 1 inch seam. In order to get the raggy look, you need a large seam, which you will clip later. One side of your quilt will be raggy and the other will be smooth. Join as many blocks in a row as you'd like the quilt to finish out. Then sew the rows together. Whoopee you're done...almost.

Use your best scissors and begin clipping the seams in half inch intervals all around each mini block and then around the sides. Again, don't sweat any mistakes here, just try not to cut into the seams and even if you do, all you'll have to do is sew a deeper seam. You'll figure it out!

Now you have your rag quilt ready to become raggy. I suggest going to a local laundromat and use their bigger machine to wash and dry the quilt. You will have a lot of fibers coming off the
raggy edges and you don't want those in your house machines.

Happy Quilting!


Does anyone know what this new visitor to the backyard is?


My next non quilting To Do List item is
copying all my VHS tapes onto DVD...can't wait to get back to quilting though...smile.

LinkWithin

Related Posts with Thumbnails